Document Exporter Word Add-In
Introduction
The Document Exporter Word Add-In is a tool designed to make working with Document Exporter for ServiceNow easier. It supports the Word-based creation of templates for exporting records from ServiceNow.
The Add-In can be used to insert placeholders for fields as well as placeholders for controlling the output such as loops at the current cursor position into the document. By connecting to the ServiceNow instance, tables and fields can be easily selected and their internal names can be copied into the document as placeholders by clicking on them. This eliminates the need to manually determine internal names and look up the exact syntax for control codes in placeholders.
Try, buy and install
![]()
Document Exporter Word Add-In you can download for free and easily via Microsoft AppSource under Document Exporter Word Add-in in Microsoft App-Store. The add-in is also available via the Store button in Word.
In the following video you will find information about how to activate an Add-In in Word.
More information about the Microsoft App-Store can be found at appsource.microsoft.com.
Prerequisites
This add-in works with the following versions of Microsoft Word:
- Word 2016 and later for Windows and Mac
- Word Online
- Word for iOS (iPad)
Your firewall must allow the following accesses:
- https://yourinstancename.service-now.com/api/now/table (GET)
- https://cdn.syscovery.com/docexporter (GET)
- https://docs.syscovery.com/docexporter (GET)
- https://appsforoffice.microsoft.com (GET)
- https://code.jquery.com (GET)
In addition, a CORS rule must be entered in your ServiceNow instance. This rule must be created by an administrator in ServiceNow under System Web Services -> REST -> CORS rules in the following form:
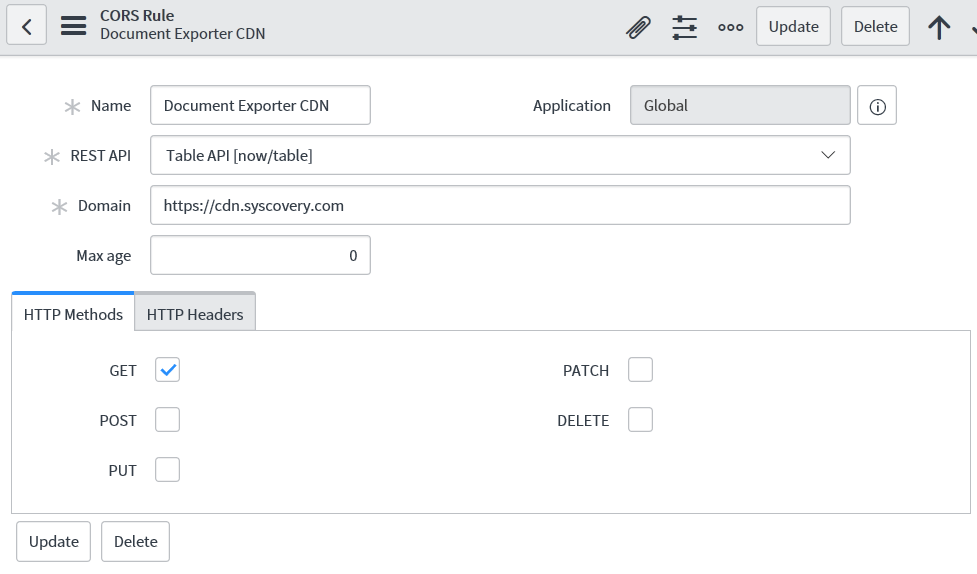
This allows the add-in to technically access the ServiceNow instance.
Access is with the permissions of the user account entered by the user within the add-in. This user account must have read access to the tables "Tables (sys_db_object)" and "Dictionary (sys_dictionary)" and must not use multi-factor authentication.
If multi-factor authentication (MFA) is activated for the users, a service account for this access can be created in ServiceNow without MFA and its user name / password can be passed to the user. The service account only needs read access to the two tables mentioned above. For security reasons, access to the user account should only be allowed via web service:
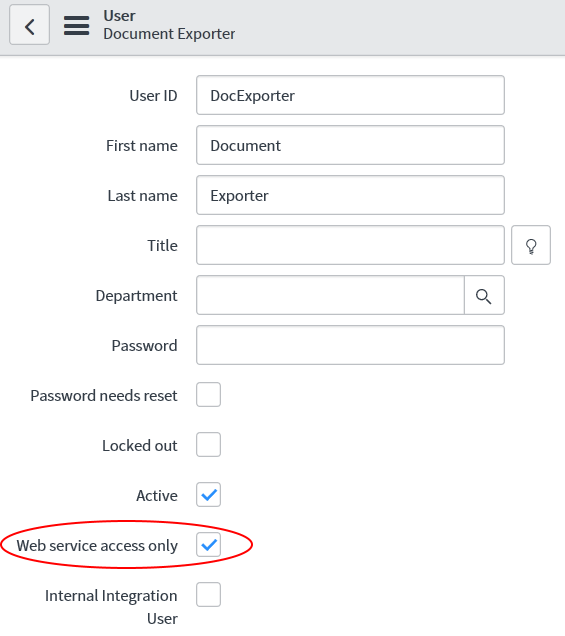
Thus nobody can interactively log in to the ServiceNow instance with this user.
Operation
The Add-In will be opened after the installation in Word from the ribbon "Start" via the corresponding button:
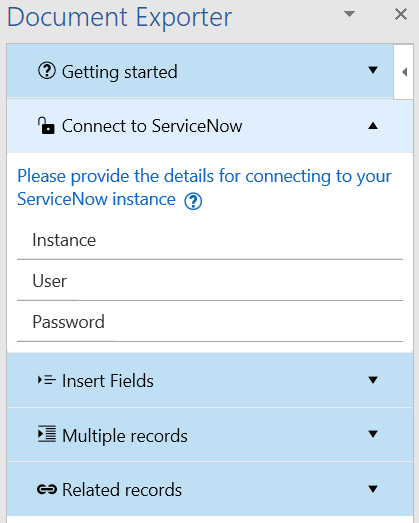
An area will open in which the individual functions can be accessed via control panels:
The individual functions are explained in more detail below.
Help to use
The online help of the add-in can be called via this area. Below the button for calling the help, the current version of the add-in is displayed.
Connection to ServiceNow
This area is automatically displayed after the add-in is started. Here the credentials for the ServiceNow instance are specified so that the other functions can retrieve table and field names from ServiceNow.
The name of the instance is the pure instance name without the domain. I.e. if the instance can be reached under the url https://companyname.service-now.com, then the part companyname is the name of the instance which must be entered here.
For user name and password, enter the data of a user from ServiceNow who must have read access to the tables "Tables (sys_db_object)" and "Dictionary (sys_dictionary)". Multi-factor authentication (MFA) must not be enabled for this user. If necessary, a specially created service account must be used (see chapter "Requirements").
Insert fields
In this area placeholders for field contents from ServiceNow can be inserted into the document. To do this, the list of tables available in the ServiceNow instance must first be loaded using the "Load tables" button. A selection box for selecting the table then appears. If only an error message with the text "error" appears, please check if in the section "Connection to ServiceNow" the instance name was entered correctly (and without the addition .service-now.com) and if in the instance the CORS rule (see chapter "Requirements") was correctly created.
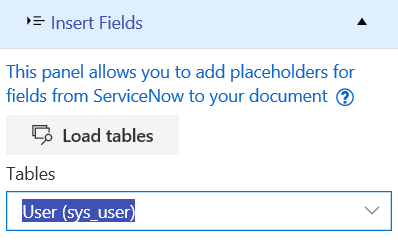
Since the selection of tables is very extensive, it is recommended that you enter at least the beginning of the table name to simplify the selection. The internal name appears in parentheses after the table title, since in some cases several tables with the same display name exist.
Usually the fields of the base table of the template are selected here. Only within loops for connected data (see later chapter) a different table may be selected here. I.e. the base table selected here should correspond to the base table specified in ServiceNow for this template. Only one base table per template is possible.
After a table has been selected, a selection box for selecting the field in the table appears below:
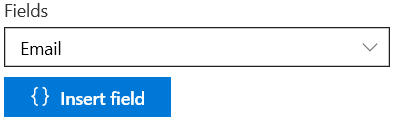
The "Insert field" button directly below the selection box inserts the selected field as a placeholder at the current cursor position in the document.
If the selected field is a reference field, an additional field selection appears automatically below it:
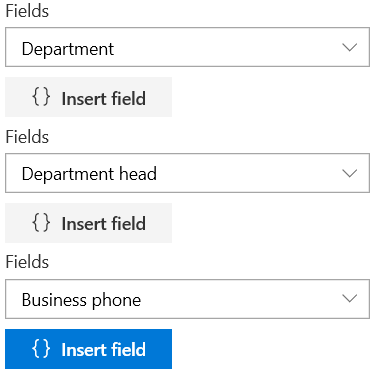
In the example above, "Department" is a reference field to the table of departments. The field "Department Head" is a reference field to the user table. By clicking the button "Insert field" directly below a field, this field is inserted into the document as a placeholder. The first button would insert the department of a user, the second button would insert the name of the department head and the last button would insert the phone number of the department head of the department. All fields refer to the data of the data record from the base table transferred during export.
Multiple records
The Document Exporter app is also able to export multiple records from a base table together into one document. The document template must be saved in the template table in ServiceNow with the type "Multiple Records".
Multiple data records can be output as a simple list below each other, within a table or in a multi-page document (e.g. one data record per page). This only depends on the structure of the document template.
The area is structured as follows:
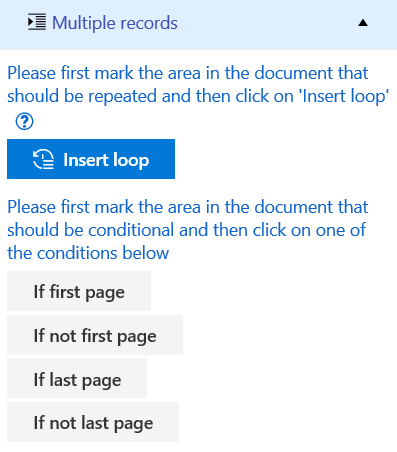
Anything that is to be repeated per record must be within a loop. To do this, mark the complete area to be repeated in the document with the mouse and then click on the "Insert loop" button in the add-in. This inserts the placeholder for the beginning of the loop at the beginning of the marked area and the placeholder for the end of the loop at the end of the marked area.
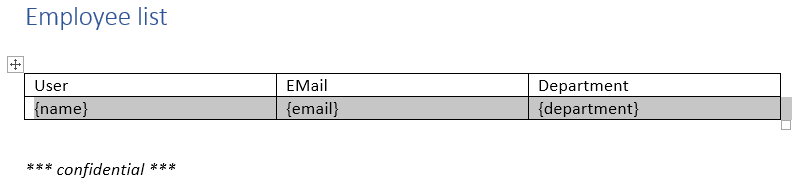
Example for a table. The table was inserted into the document with two lines. The first line contains the column headings, the second line contains fields from the user table as described in the previous chapter. The second line was then completely selected with the mouse:
Click on the button "Insert loop" in the Add-In to add the loop to the second line:

The result after the export is then:
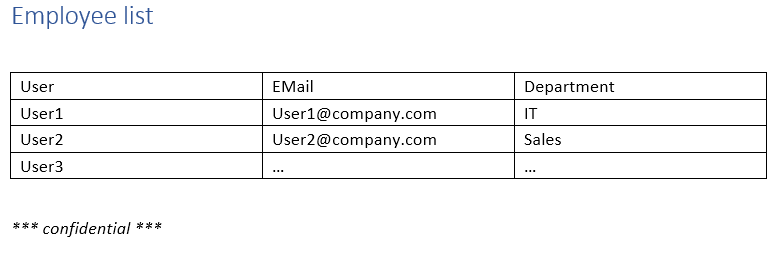
If the loop was wrongly placed, the placeholders {#Records} and {/Records} must be removed from the document before the loop can be inserted again.
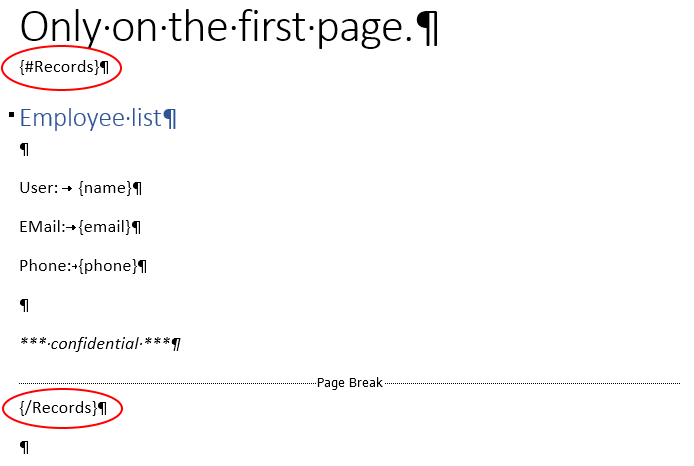
Example for a multi-page document. The fields were placed freely on the page and a manual page break was inserted at the end. Then everything to repeat (including the page break) was marked with the mouse:
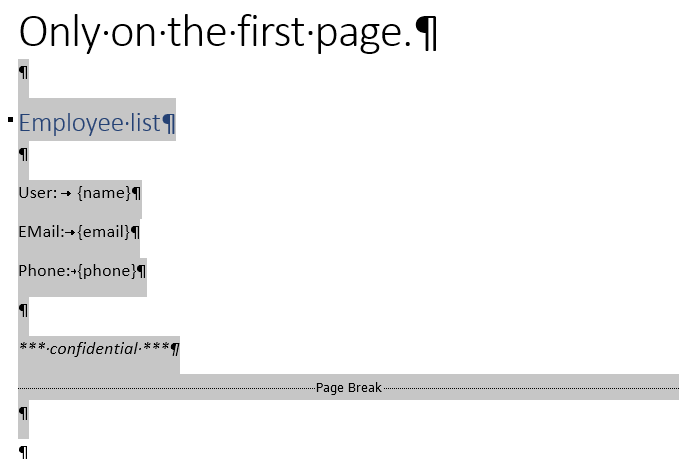
The Word control character display was activated with the button  In the ribbon "Start" to make the control characters visible.
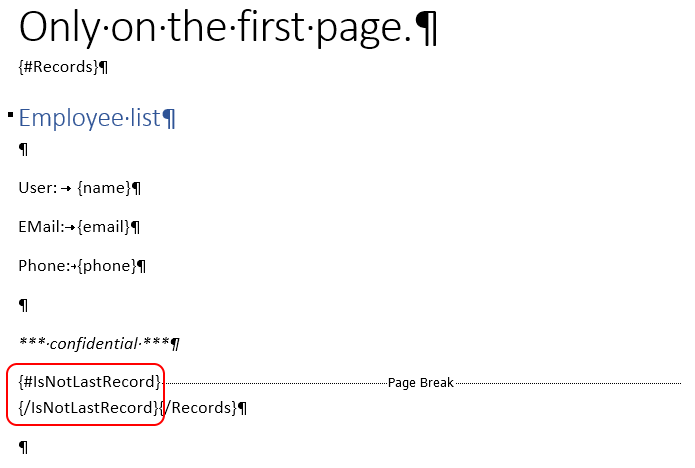
After the content has been marked as above, click on the button "Insert loop" in the Add-In to insert the placeholders for the loop:
The page break is now repeated for each record as well. Thus also for the last record which usually results in an unwanted empty page at the end. To prevent this, there are conditions which are checked during the execution of the loop:
- If first page
- If not first page
- If last page
- If not last page
Anything between the start and end placeholders of this condition is only output according to the condition. So you can mark the page break and click on the button "If not last page":
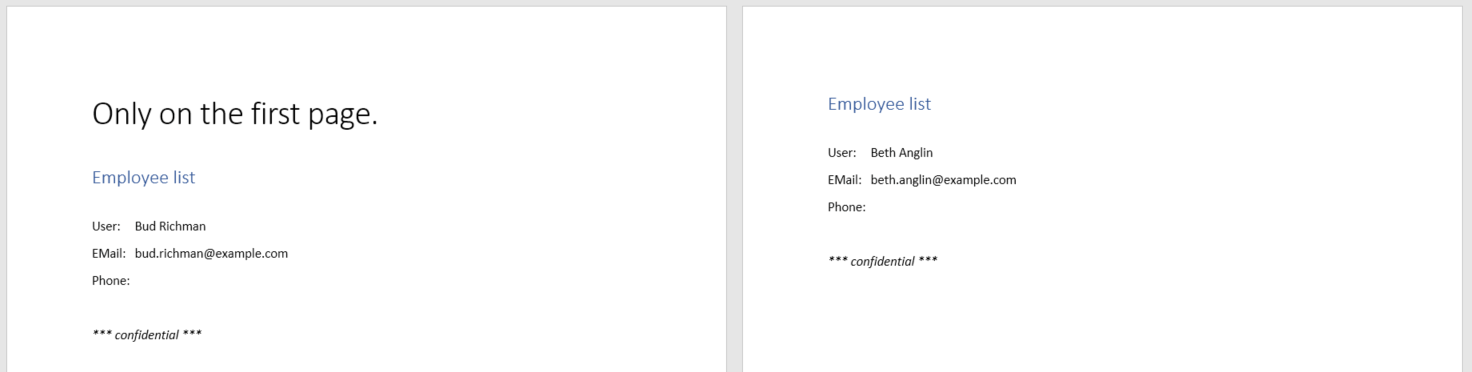
This will output the page break for all pages except the last page.
The result after the export is then:
Connected data
This area provides support for adding data from tables other than the base table. This data must be connectable via a simple field comparison (contents of base table field = contents of field from connected table). As in the previous chapter, the data of the linked table is also output here within a loop.
If the loading of the tables should only be acknowledged with the error message "error", please check whether the instance name was specified correctly in the section "Connection to ServiceNow" (and without the addition .service-now.com) and whether the CORS rule (see chapter "Prerequisites") was correctly created in the instance.
In the "Connected data" area, the following settings can be made after loading the tables by clicking on the "Load tables" button:
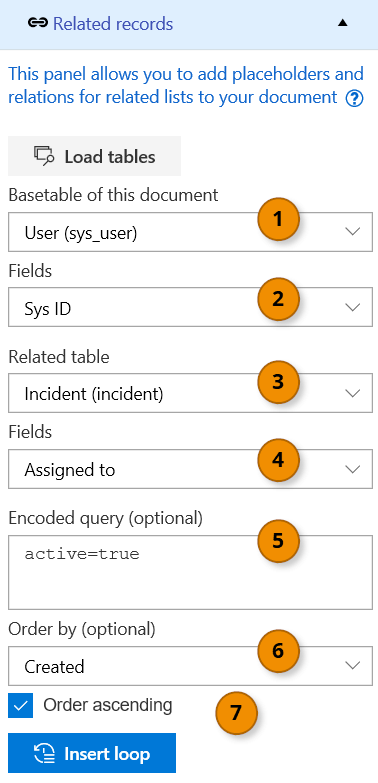
Description of the input fields:
-
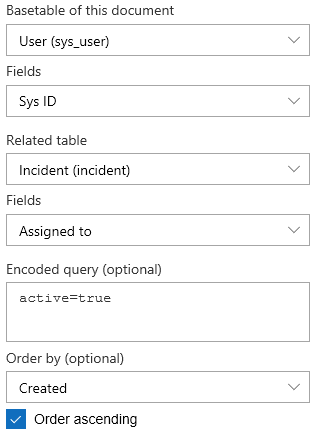
Basetable of this document
-
The base table is selected here. This is the table from which the record is to be exported in ServiceNow.
-
Fields
-
Selects the field to be linked in the base table. This field is linked to the field from the linked table using the "=" operator.
-
Related table
-
Selects the table to be linked to the base table.
-
Fields
-
The reference field to be linked from the linked table is specified here. This field is linked to the field of the base table by the "=" operator.
-
Encoded query
-
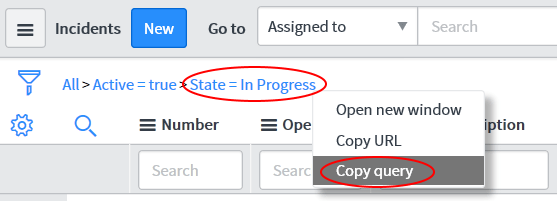
Optional specification of an additional query on the linked table to not output all linked records. Here several filter criteria can be specified in the default query format of ServiceNow. The query can be easily created by setting a filter in the list view of the linked table in ServiceNow and then right-clicking on the filter to copy the query text to the clipboard:
-
Order by
-
Optional selection of a field in the linked table according to which the records found are to be sorted (if more than one were found).
-
Order ascending
-
If this option is checked, the records found in the linked table are sorted in ascending order according to the previously specified field, otherwise they are sorted in descending order.
To output the data from the connected table in the document, placeholders must be placed for the fields of the connected table. A table in Word is usually used for this purpose. Inserting the placeholders is done in the same way as described in the chapter "Inserting Fields".
Then mark the area to be repeated for each data record from the linked table. A click on the button "Insert loop" then inserts the placeholders with the control commands according to the settings made.
If the loop has been inserted at the wrong place or with wrong settings, all associated placeholders must be removed manually before the loop can be inserted again.
The following wildcards are used:
- start of the loop:
{#%Ttablename} - end of loop:
{/%Ttablename} - Field link:
{%MfieldBasistable:fieldCombinedTable} - Optional query:
{%Qquery} - Optional sorting (ascending):
{%OAfieldname} - Optional sorting (descending):
{%ODfieldname}
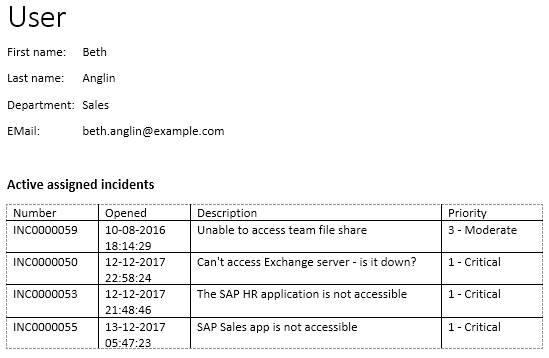
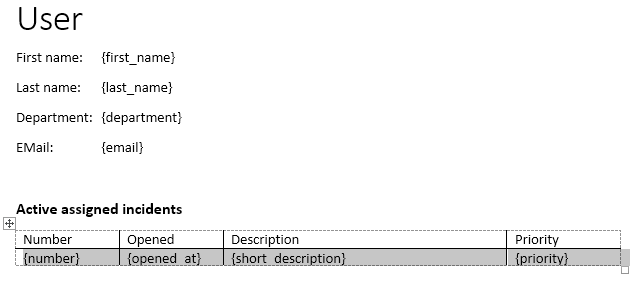
Example: Output of a user data record (basis) with the active incidents assigned to the user (associated data):
The fields of the base table have been inserted into the document. Also a table with the placeholders for the fields from the linked table Incidents. The row with the fields of the connected table was marked in Word with the mouse.
The settings have been made as follows:
Click the button to add the placeholders to the table:
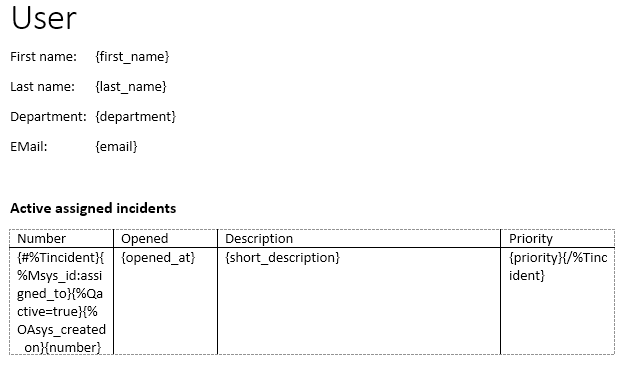
The result after the export will look like this: